Dark Light

How-To Guides

Need to know something about our site or products ?

The all new Printex Help Desk section has all the answers to the most difficult questions when it comes to printing. Below you will find visual as well as text based guidance on an array of different topis. If you require more information please create an account and submit a help desk ticket.

We will get back to you with the relevant answers as soon as possible.

How-to Guideline | Website

Topics

Step 2

Start off by clicking on the user icon at the top right of the header

Step 2

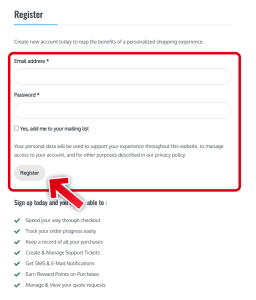
Select the option to register new account

Step 3

Fill in your e-mail address (should be an e-email you use regularly such as a G mail account or work e-mail as all info will be sent to the address.

Type in your Secure Password  The password should be at least twelve characters long. To make it stronger, use upper and lower case letters, numbers, and symbols like ! ” ? $ % ^ & ).

Step 1

Start off by clicking on the user icon at the top right of the header

Step 2

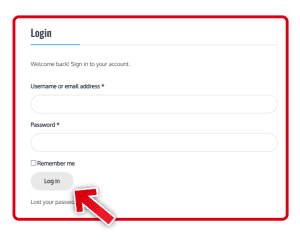
Click the SIGN IN button if you are a returning customer

Step 3

Insert in your e-mail address (should be the e-email address that was used to create your Printex Account

Type in your Secure Password  This is The password that was created when the account was registered

Step 1

Click on the user icon located at the top right of the websites header

Step 2

Select the orders link on the My Account Dropdown

Step 3

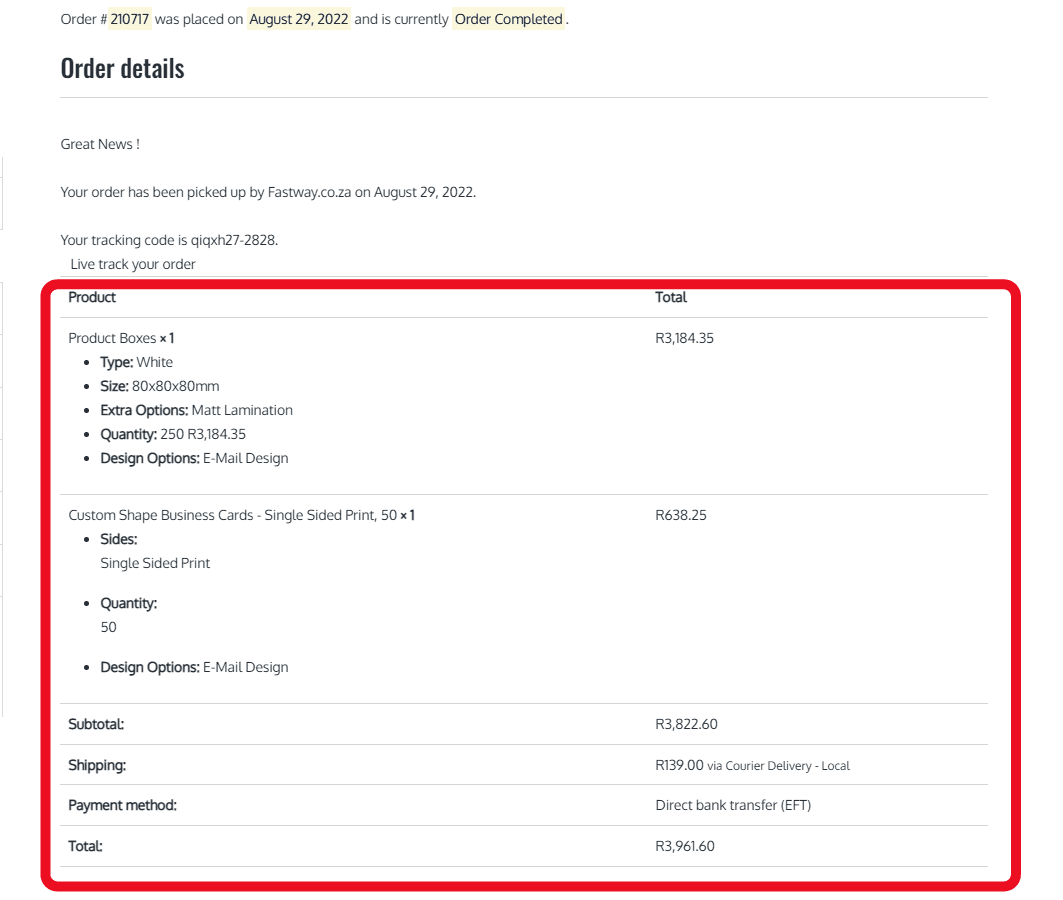
On the orders page in your My Account section click on the ‘view’ button to navigate to the order details page

Step 4

Once loaded, you can view all order information such as product type, quantity, order total etc.

Step 1

Click on the user icon located at the top right of the websites header

Step 2

Select the account details link on the My Account Dropdown

Step 3

On the account details section of your account the following account information can be viewed or changed :

  • First name
  • Last Name
  • Display Name
  • Email Address

Step 3

On the account details section of your account the following account information can be viewed or changed :

  • First name
  • Last Name
  • Display Name
  • Email Address

Step 1

Click on the user icon located at the top right of the websites header

Step 2

Select the account details link on the Addresses Dropdown

Step 3

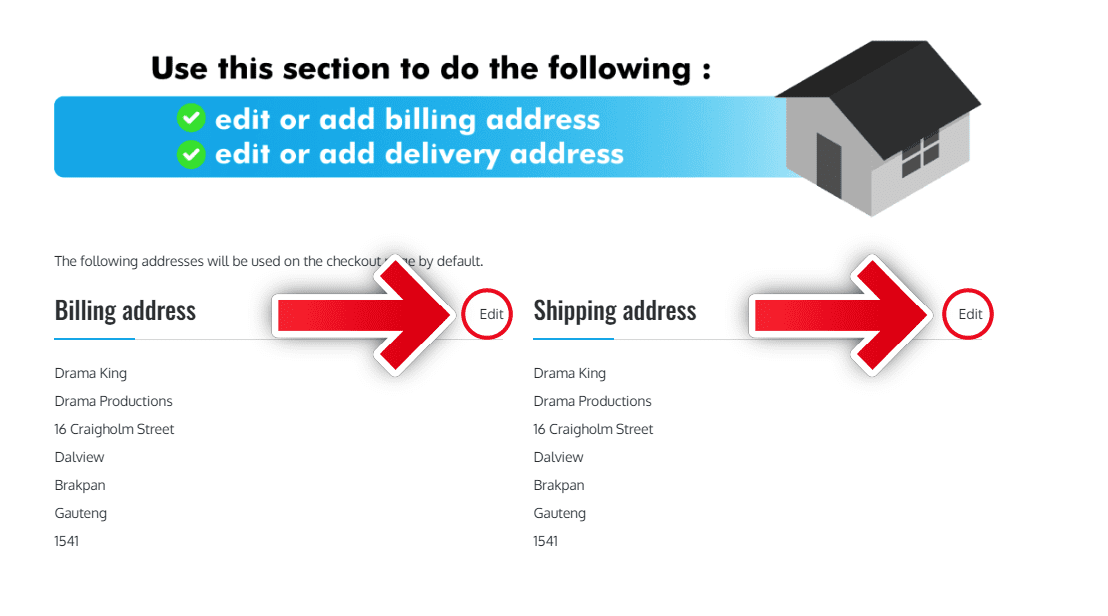
On the account details section of your addresses to edit your shipping or billing address simply click on the edit button

Step 3

On the the next screen all address information can be changed such as :

  • Street Name
  • Province
  • VAT Number
  • Name & Surname
  • Phone Number
  • Postal code etc.

Method 1

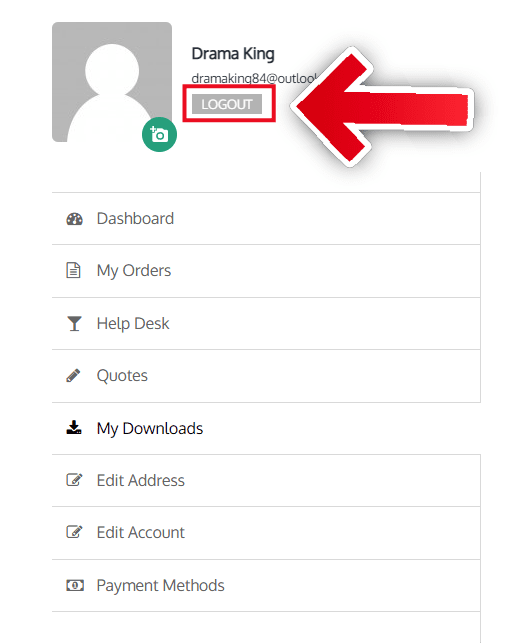
Navigate and click on the the logout button just below your avatar in the left upper corner in your My Account screen

Method 2

Click the LOG OUT link on the Dropdown in the right top header

How-to Guideline | Artwork Design

Topics

Step 1

On the product page, once all variation option have been selected the Design Option Button will appear, click on it

Step 2

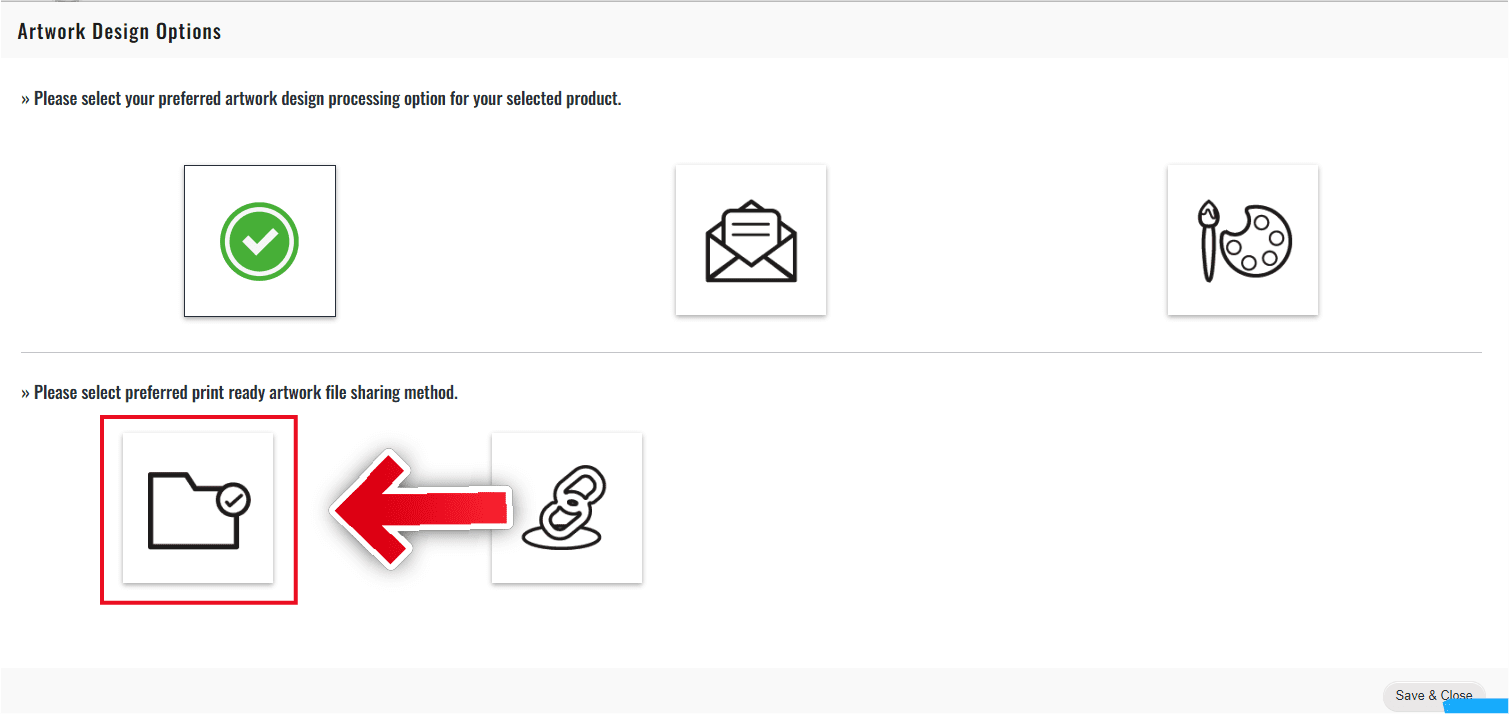
On the Design Option Pop-Up select upload design option located as the first option on the far left side

Step 3

Once selected the following option will be either upload design or download link. Select the upload design on the left hand side.

Step 4

On the upload design section an option will be available to select your required file from your device. Click on the ‘select file to upload’ button

Step 5

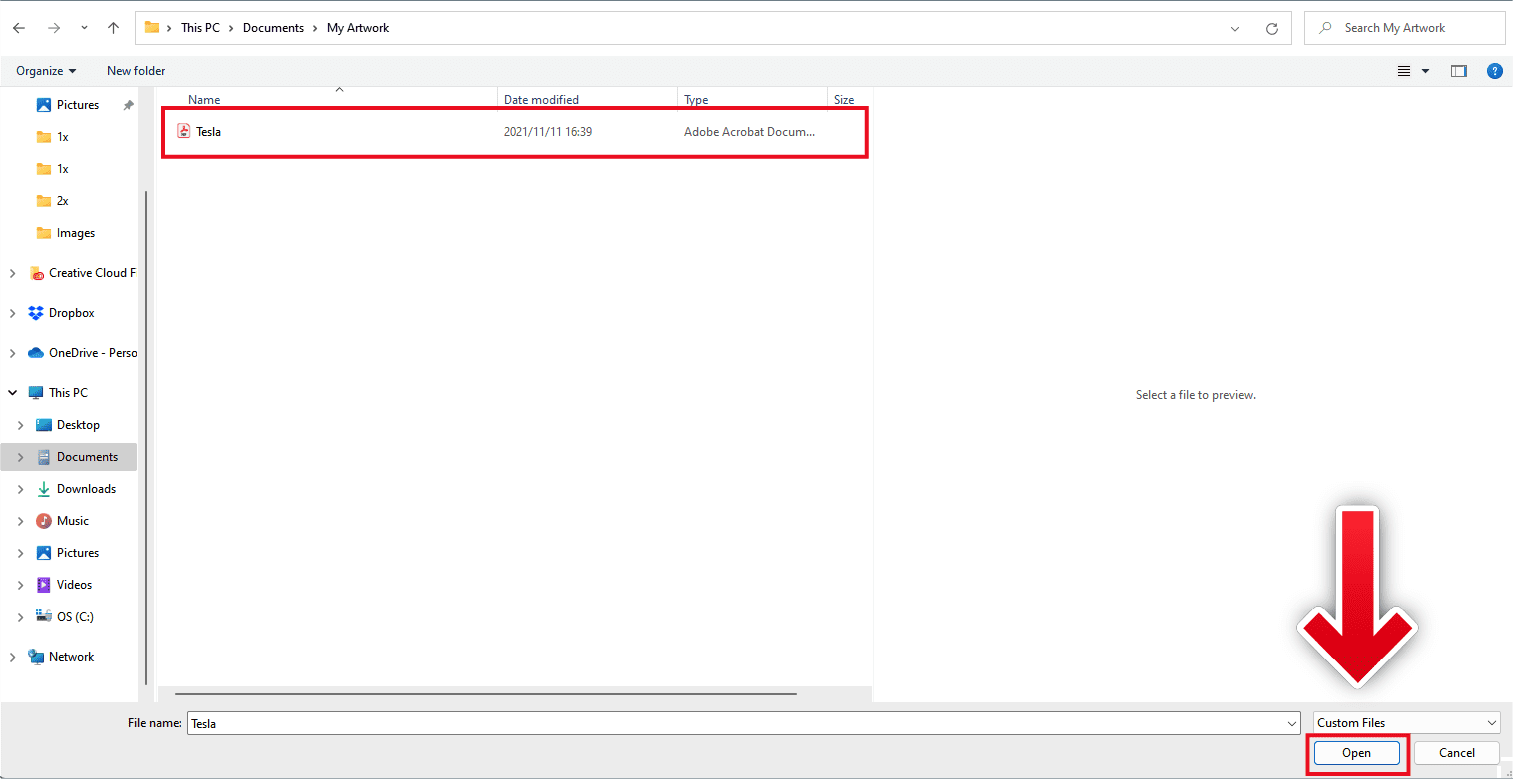
Depending on your operating system, navigate to the required file that you wish to upload to your order.

Step 6

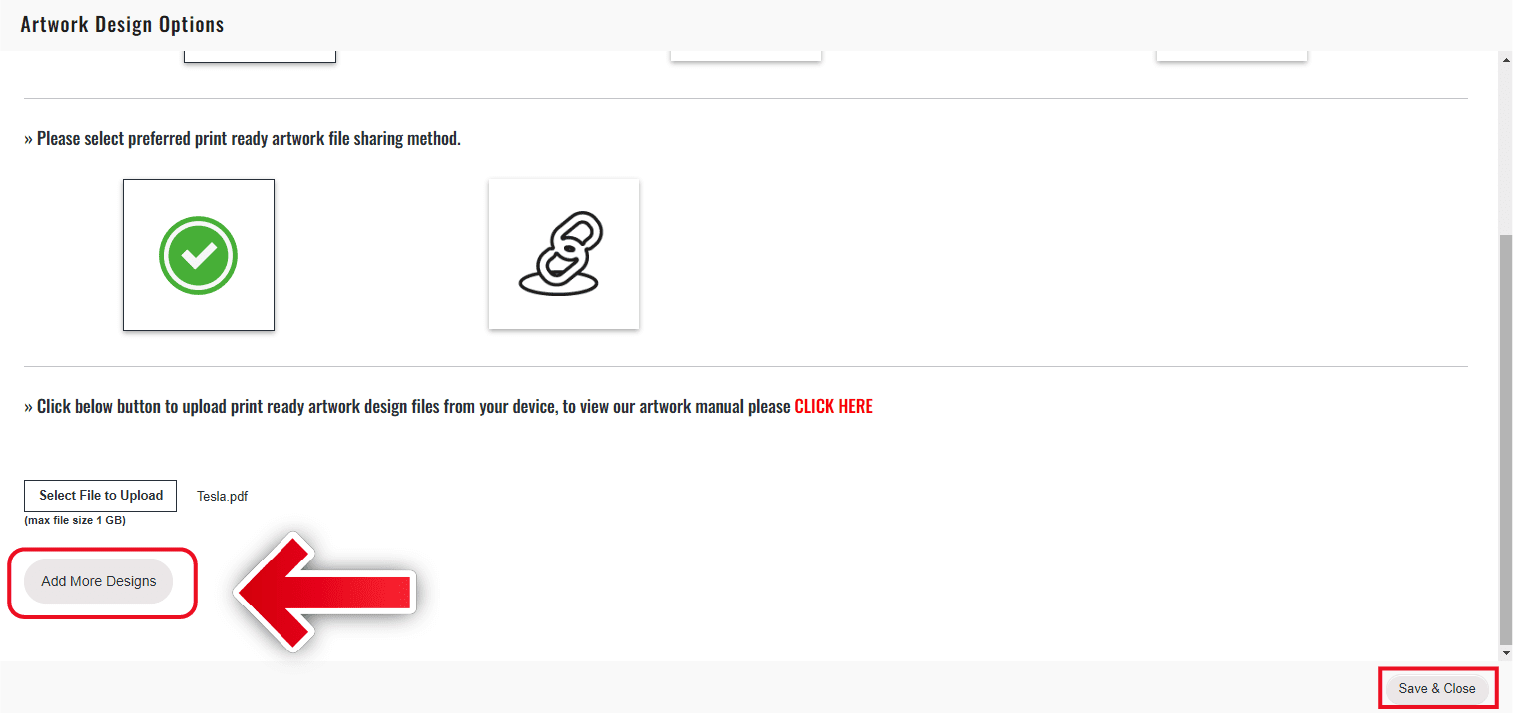
Final step will be to check that the correct file name exists next to the previous button, once satisfied click on the save & close button located at the bottom right of the pop-up section

Follow Steps 1 – 5 from the Single Design Upload from the previous section

Step 6

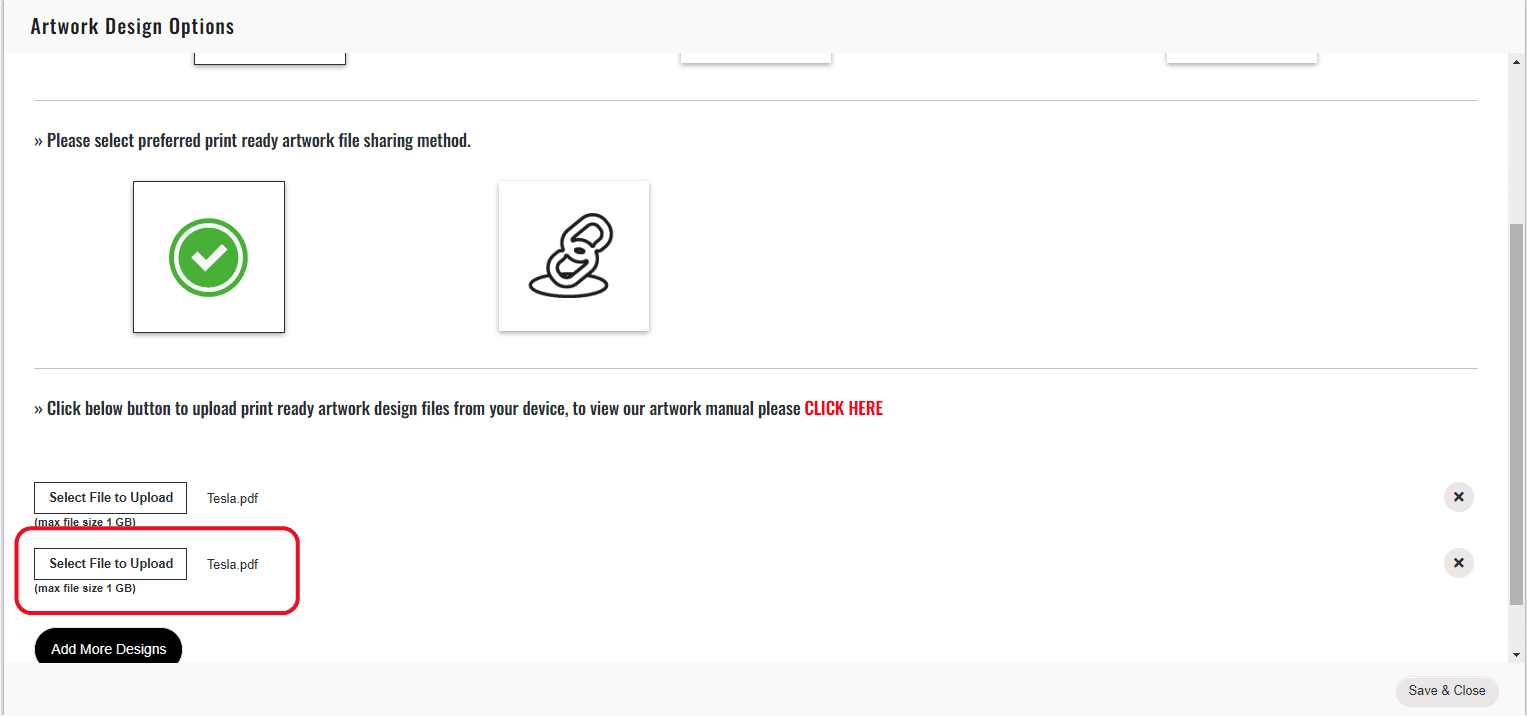
After the first initial file has been added, click on the add more design button below the first upload button option

Step 7

Once add more design has been selected more upload button option will be added for you to use

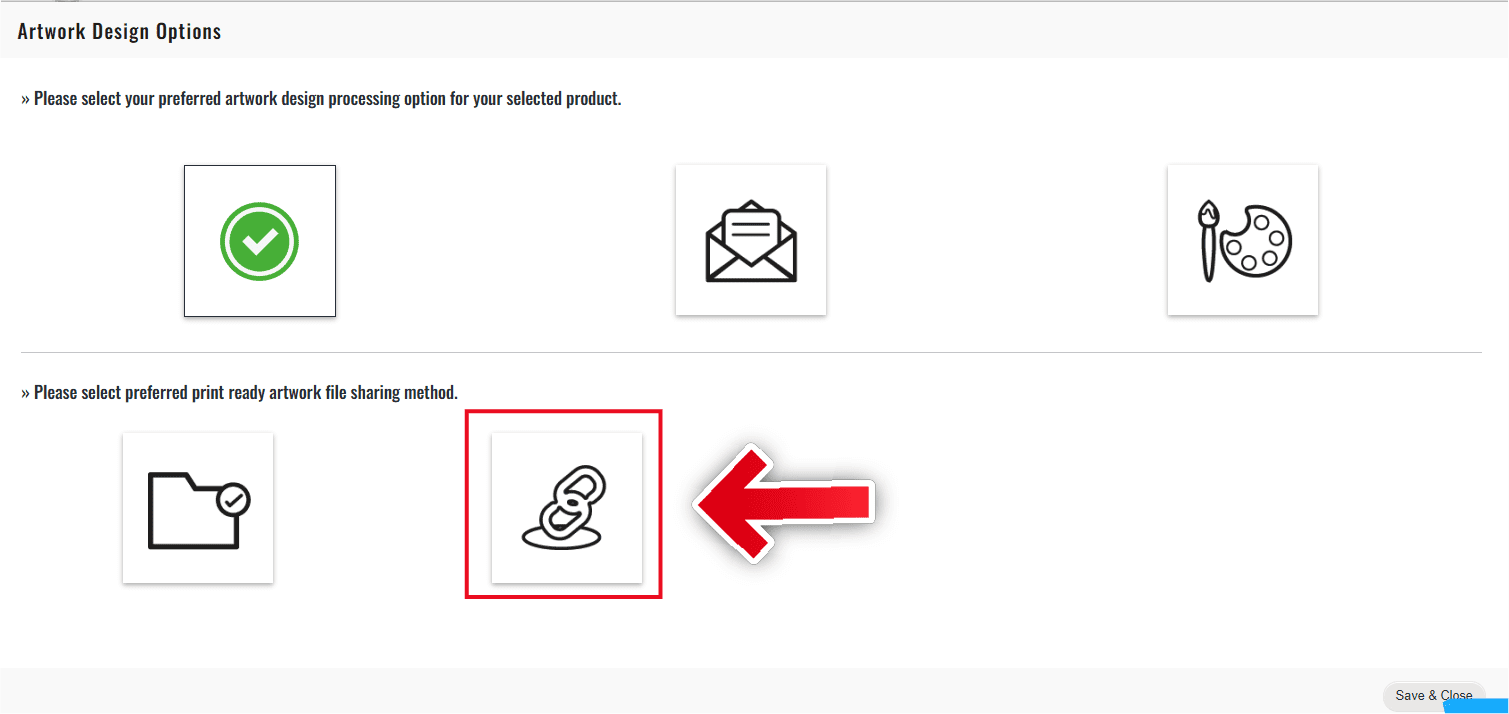
Follow Steps 1 – 2 from the Single Design Upload from the previous section

Step 3

Select the file download link option on the right hand side

Step 4

Paste the full file download www url in the input field provided

Step 1

On the product page, once all variation option have been selected the Design Option Button will appear, click on it

Step 2

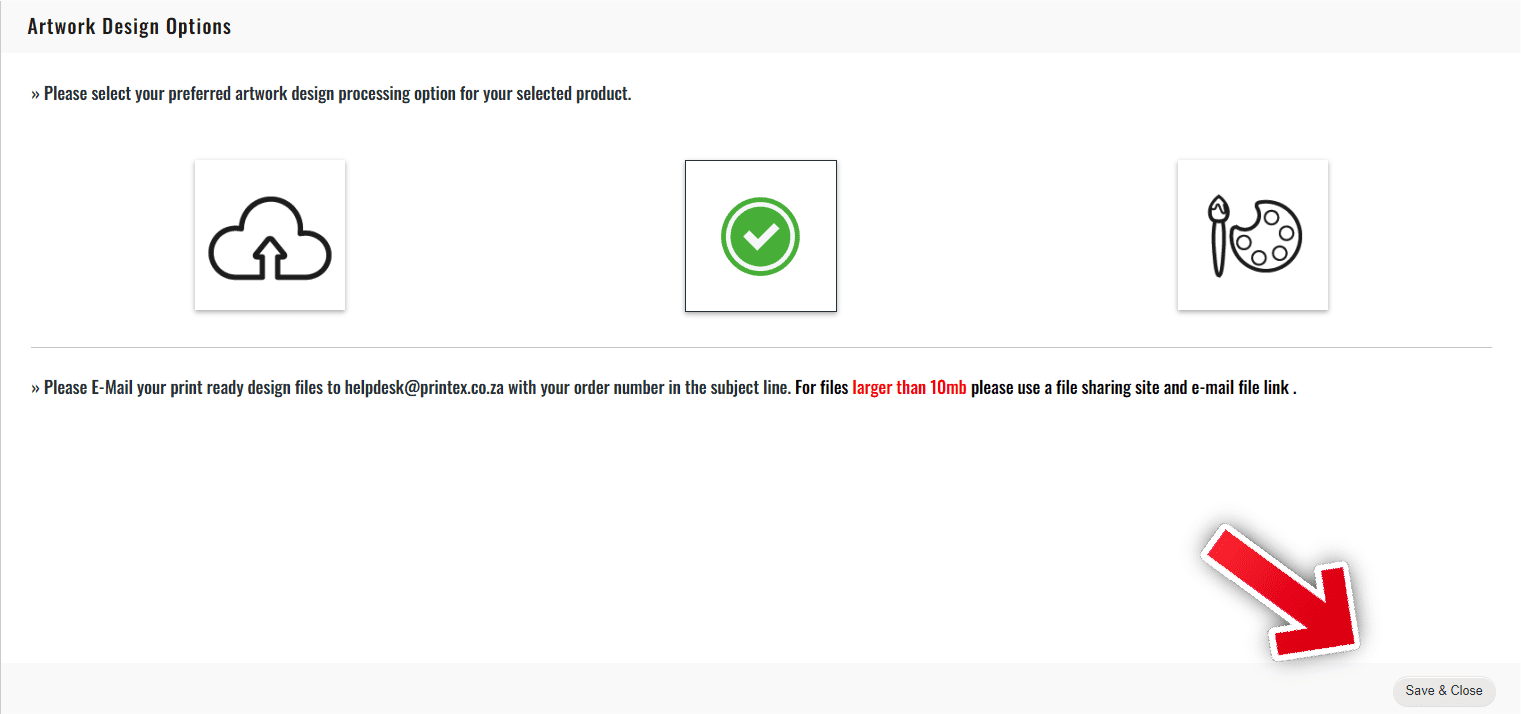
On the Design Option Pop-Up select e-mail design option located as the middle option

Step 3

Once selected then then the window can be closed as the option will be saved with your product

Step 1

On the product page, once all variation option have been selected the Design Option Button will appear, click on it

Step 2

On the Design Option Pop-Up select custom design option located on the far right

Step 3

Once selected then then the window can be closed as the option will be saved with your product

Step 3

Once selected then then the window can be closed as the option will be saved with your product

How-to Guideline | Ordering

Topics

Type the product names or product keyword in the search bar to get a dropdown of the suggested products that are found in our store.

Step 1

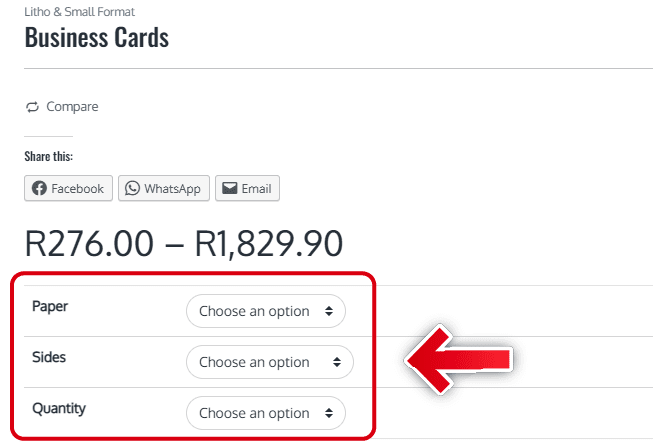
Select product options from the the choice options given on the product page. The add to cart button & quantity button will not be visible until all required variations have been selected for the product.

Step 2

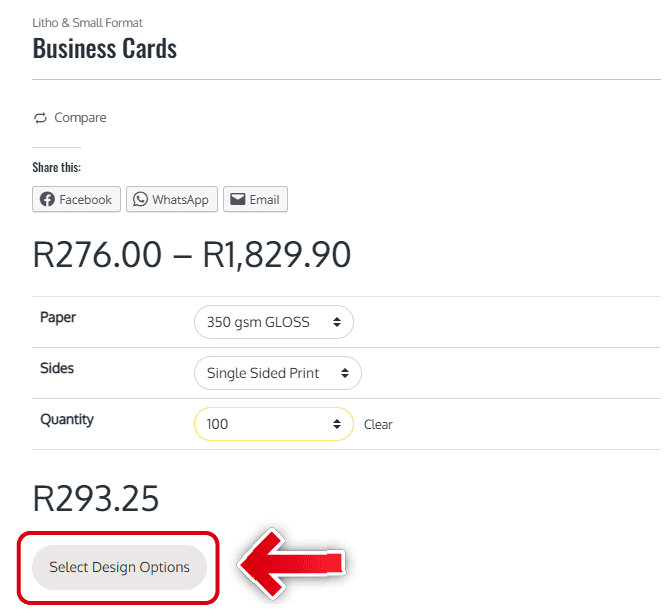
Once the product options have been configured, the design options button will appear. For further steps please refer to the artwork & design section above.

Step 3

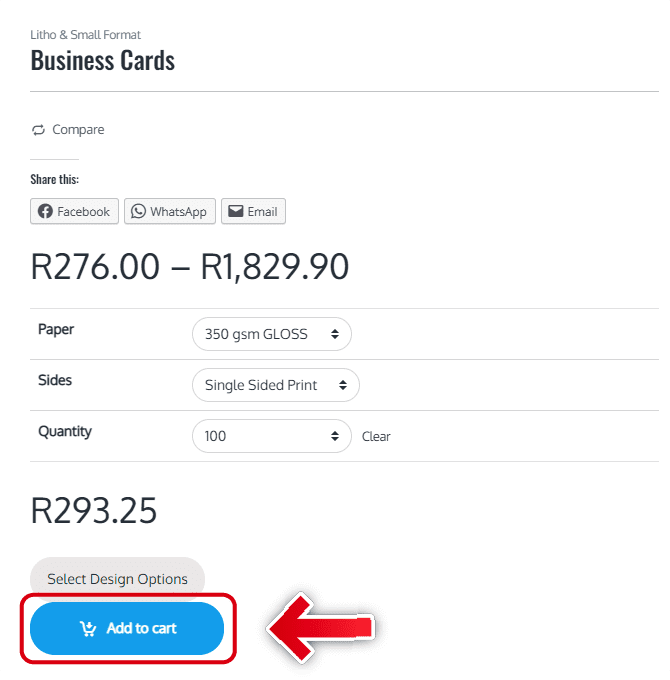
Click the add to cart button once all option have been selected and design options have been specified and saved. This will add the configured product to your cart.

Step 1

Navigate to the top right hand side of the stores header bar and select the cart icon

Step 2

Once selected, there will be a dropdown with a short summary of your cart items, select the VIEW CART button to view your full cart with selected product options

Step 1

Navigate to the top right hand side of the stores header bar and select the cart icon

Step 2

Once selected, there will be a dropdown with a short summary of your cart items, select the CHECK OUT button to go directly to the check-out page without viewing your cart beforehand

In the cart section view, all product’s added to cart can be viewed in summary.

The following Info can be viewed or edited :

  • Change Product Option
  • Change Product Quantity
  • Delete Individual products from your cart
  • Empty your entire cart
  • Coupon codes can be applied for discounts
  • Product Price Summaries

Once you are satisfied with the product selections, please click on the the check out button

If your are a returning or existing customer, sign up of new information can be skipped by clicking on the appropriate link at the top of the check out page.

This option will take your to the login screen and the standard login procedure specified in the my account section can be followed

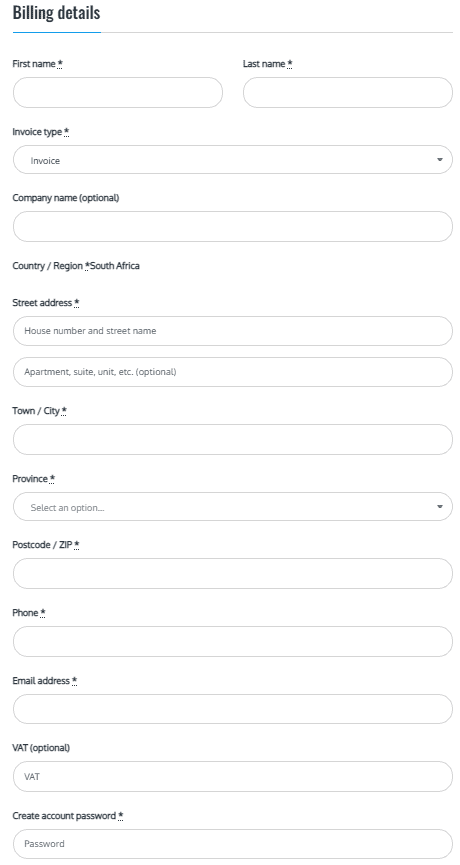
All new customers should fill out the form section as this will be used to create your account and to make sure your customer profile is up to date with your latest accurate information.

The following Info & Details can be added

  • Name & Surname
  • E-Mail Address
  • Contact Number
  • Location Address
  • Company Name (Optional)
  • Vat Number (Optional)
  • Receipt or Invoice required
  • Preferred Account Username
  • Secret Password for your login to your account

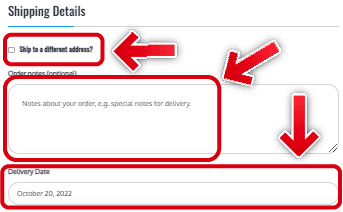
A different address from the billing address can be specified by clicking on the checkbox ” ship to different address” . This will enable you to specify all the address info for your preferred shipping location.


Multiple shipping locations are not yet available for our store.

Please contact us for custom quote if required.

If there are any additional information required for the shipping of your order, please specify them in the provided input field.

Info such as, gate code, office within office block, entry procedure to secure estates etc should be provided if required.

Once your Billing , Shipping Addresses and details and addiotnal noted have been added.

You can select a payment option form the provided list.

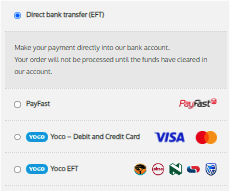
The following payment option are available :

EFT / DIRECT PAYMENT

Make your payment directly into our bank account.
Your order will not be processed until the funds have cleared in our account.

Please send all proof of payments with order number in the subject line to helpdesk@printex.co.za

PAYFAST

Payfast is a convenient & secure payment that can process Instant EFT , Credit Card, Cheque Card etc payemnts.

Please view more about Payfast by clicking here

YOCO

Pay securely with your debit or credit card via Yoco or you can also Pay securely with Electronic Funds Transfers

Please view more about Yoco by clicking here

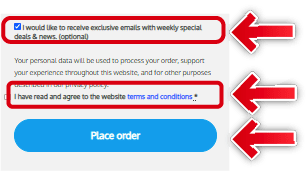
A optional selection is available to be added to our weekly newsletter and mailing list, we will not spam your we promise !

Before you can do the last final step, you have to confirm that you have read & accepted our Terms & Conditions

Also please note Your personal data will be used to process your order, support your experience throughout this website, and for other purposes described in our privacy policy.

By establishing contact with our customer serice through the means available to you in the “Help Desk” section of the Website, Printex as data Controller, will be able to use your data to reply to your report or request for information. To ensure the quality of our Customer Support always meets your expectations, Printex reserves the right to invite you via email to complete surveys on your experience and level of satisfaction. If you are registered with the Website, the processing will take place throughout the validity of your registration, and in any event until the end of the tax year following cancellation of the user’s registration. In the other instances, the data will be stored for the time necessary to duly manage your request and will be stored until the end of the tax year following the request for information. We remind you that by accessing your Customer Area or by writing to helpdesk@printex.co.za, you can always access your data, amend, update or erase the data, and receive them in a structured, commonly used and machine-readable format and request the transfer of your data to another party. Should your rights be breached, you may moreover lodge a complaint with a data protection authority for your personal data protection (POPIA). You are furthermore entitled to object at any time, on grounds associated with your specific situation, to the processing of personal data that concern you. Please refer to the full text of the privacy policy for further information.
SHOPPING CART

close