What is bleed? And why do we need it?
This module explains what “bleed” is and why it’s necessary in the design and print process.
We also explain how you can add bleed to a document you’ve designed. Finally, it gives you examples of eight common mistakes, along with suggestions on how to fix them.
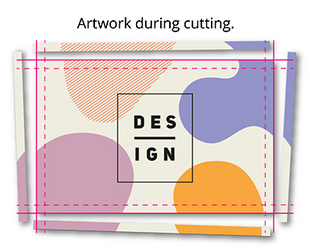
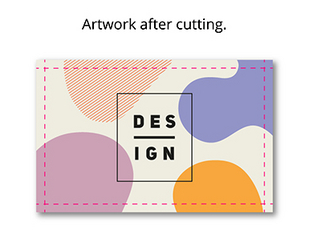
When your design extends all the way to the edge of the paper, you need bleed. Why? A commercial printing press prints multiple products onto large sheets or rolls of paper which then get cut down to size.
Because it’s impossible to cut precisely down to the millimetre, a little overprint is required on each edge. The standard margin for error required by printers is 3mm. This is the bleed area.
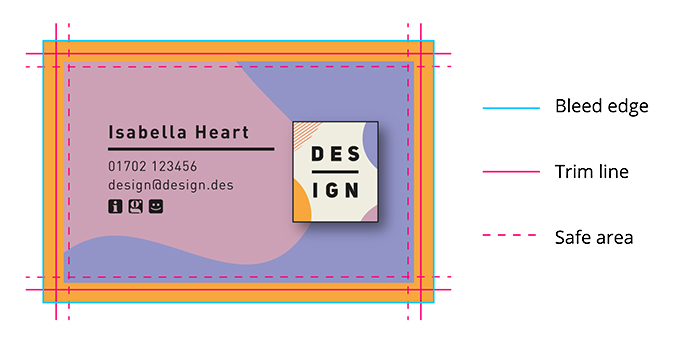
To understand how we account for variances in the cutting process, designers need to know about the bleed area, the trim line and the safe area.
Bleed area
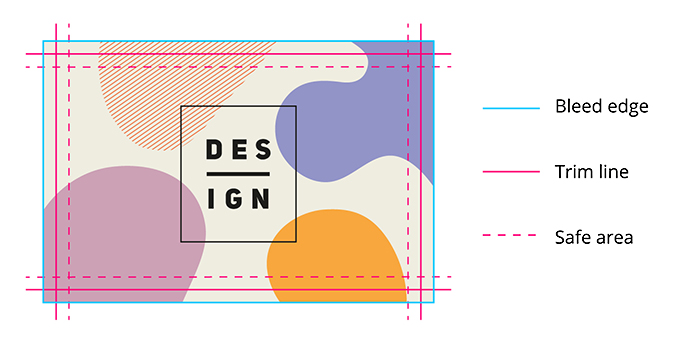
Background colours and patterns must extend at least to the edge of this area to avoid unprinted white strips appearing at the edge of the document. The crop marks outline where the document should be trimmed, and the bleed is outside those marks.
Trim line
This is the guide for cutting out the final product. It’s indicated on your proof by crop marks (your design doesn’t need to feature crop marks; we’ll add them on your proof).
Safe area
Everything within this area is guaranteed to appear on the finished product, even if the cutter were to stray inside of the crop marks by the maximum margin for error – 3mm.
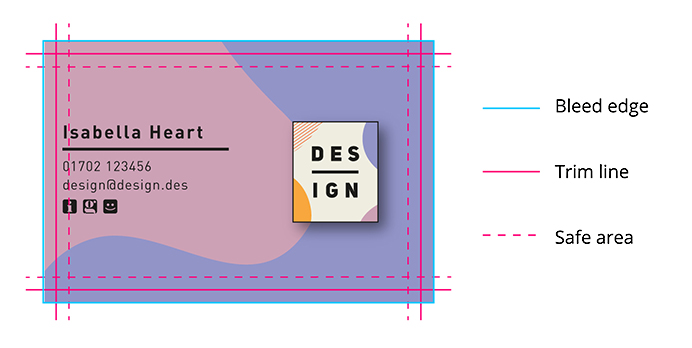
The example below illustrates a correctly designed card with 3mm of bleed, safe area and crop marks.
Bleed and safe area explained
How much bleed is required?
Industry-standard is 3mm of bleed on each edge of a document, with a safe area that starts 3mm inside the document edge. This means your artwork file should have an extra 6mm in total to the width and height over and above the size of the document you wish to produce.
For example, a finished A4 sheet is a standard size of 210x297mm. When creating a print-ready artwork file for an A4 product, therefore, the supplied file should be at least 216x303mm to incorporate an extra 3mm bleed around each edge. For more tips on preparing print-ready files, check out our guide to supplying artwork.
At the end of this guide, you’ll find a table containing dimensions for most standard print documents, along with the minimum dimensions for your artwork file including a bleed area.
What is the safe area?
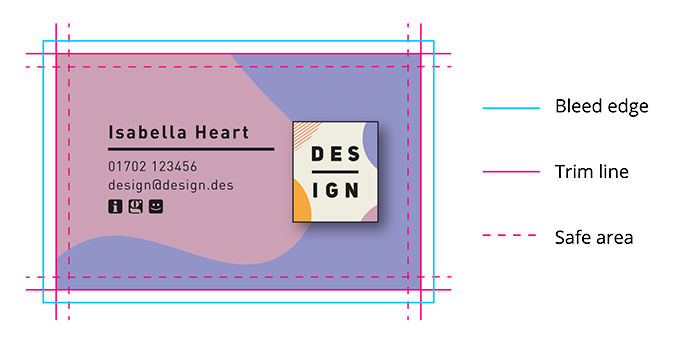
The boundary of the safe area is an additional 3mm inside the trim line. No text or essential details should appear outside of this area, as anything within 3mm of the trim line is at risk of getting cut off.
A correctly designed business card
8 common mistakes (and how to rectify them)
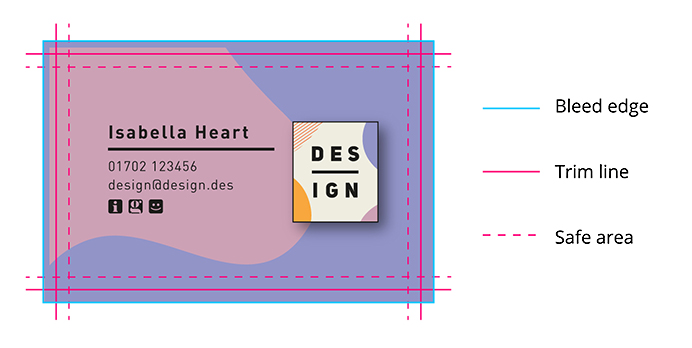
1. No bleed area
Issue: The document has not been created with a bleed area, or the bleed area has been left white on the document. If the trimming is off by even a hair, white lines will appear at the edges of the finished product, appearing messy and unprofessional.
Solution: Create a bleed area by expanding the background artwork so it extends 3mm beyond the trim line in all directions.
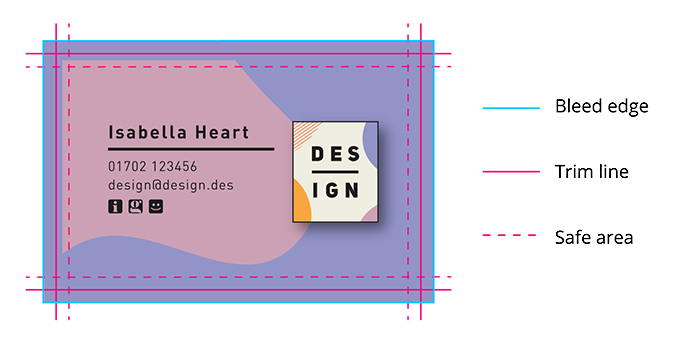
2. Text inside the bleed area
Issue: Text appears inside the bleed area. Any text outside the trim line that strays into the bleed area will almost certainly be lost.
Solution: Move all text and essential details within the safe area to avoid them being lost.

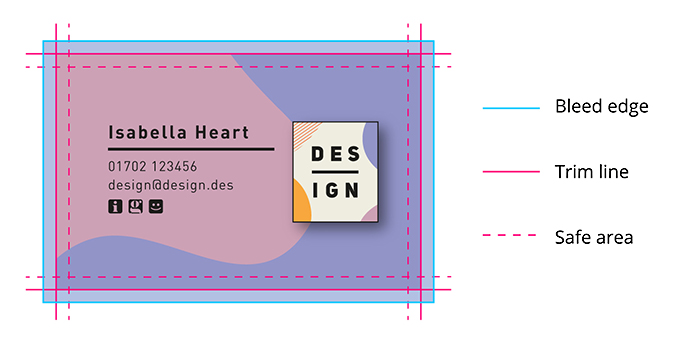
3. Text outside the safe area
Issue: Text appears outside the boundary of the safe area. Any text outside the safe area is at risk of getting trimmed off.
Solution: Move all text and essential details within the safe area to avoid them being lost.
4. Bleed area is a different colour from the rest of the design
Issue: If the cutter strays slightly outside of the trim line, an unsightly sliver of the contrasting colour will appear at the edge of the finished product.
Solution: Ensure the bleed area displays a continuous colour or pattern with the rest of the background design.
5. An object touching the trim line does not extend to the edge of the bleed area
Issue: If the cutter strays slightly outside of the trim line, a line may appear between the object and the edge of the finished product.
Solution: Ensure the object continues beyond the trim line, right up to the edge of the bleed area.

6. An object finishes halfway between the trim line and the safe area
Issue: Depending on which way the cutter strays, some copies of your print may feature a strip of the background between the object and the edge, and on other copies, the object may appear flush with the edge leading to inconsistent copies.
Solution: Ensure the object either extends right out to the edge of the bleed area or remains entirely contained within the safe area.
7. Not enough bleed
Issue: The document doesn’t have the full 3mm bleed area around the trim line, but the background artwork doesn’t extend to fill the entire bleed area. If the cutter strays too far outside the trim line, unsightly lines will appear at the edges of the finished product.
Solution: Extend the bleed area to cover the full 3mm beyond the trim line in all directions.
8. A border that forms part of your design is too close to the edge
Issue: Your artwork features a border design around the edge, but it’s either outside or right at the edge of the safe area. This means the border is at risk of appearing too narrow or getting trimmed off altogether on one or two sides.
Solution: Ensure your border design sits comfortably within the safe area at each edge in order for it to frame your finished print on all four sides once it’s been trimmed.
What if I can’t correct my document?
If you’re unable to amend the design yourself, there are a couple of options open to you:
1. Print with a white border
You can request that we print document with a 6mm white border to ensure a neat finish with no slivers of white or missing content.
2. Have the artwork amended by a graphic designer
A professional designer should be able to recreate or amend your existing artwork and remove any issues. If you’d like our in-house design team to take a look, let us know.
We print all of your artwork on large sheets – of paper, plastic, or whatever material you’ve chosen! – because it’s a quicker and cost-effective way to print lots and lots of different things.
Trimming in practice
After printing, we trim them down to the right size using a guillotine, which looks like this:

Trimming isn’t always exact – sometimes it’s a mm here or there.
So, to make sure there are no thin white borders around your design after we’ve trimmed it, it’s a good idea to ‘bleed’ out the background of your artwork design to create a thin border around the edge of your design. This border is known as the bleed area and is usually around 3mm thick.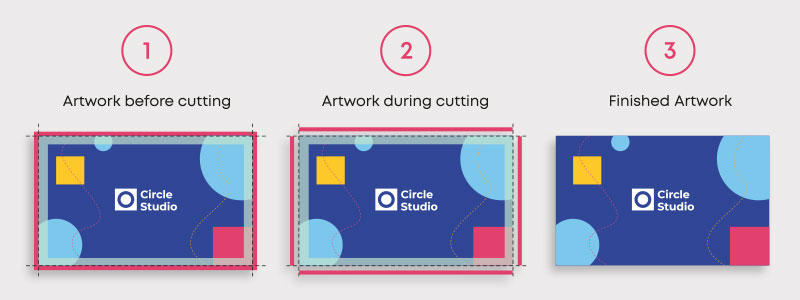
How thick should the bleed area be?
Bleed area is a different thickness depending on the print item you want, but is usually 3mm on each side of your design. For example, the standard business card size is 85mm x 55mm. With bleed, your artwork size will be 91mm x 61mm.
Choose the product you’d like on our website and you’ll be able to find the full size with bleed in the artwork section of the page.
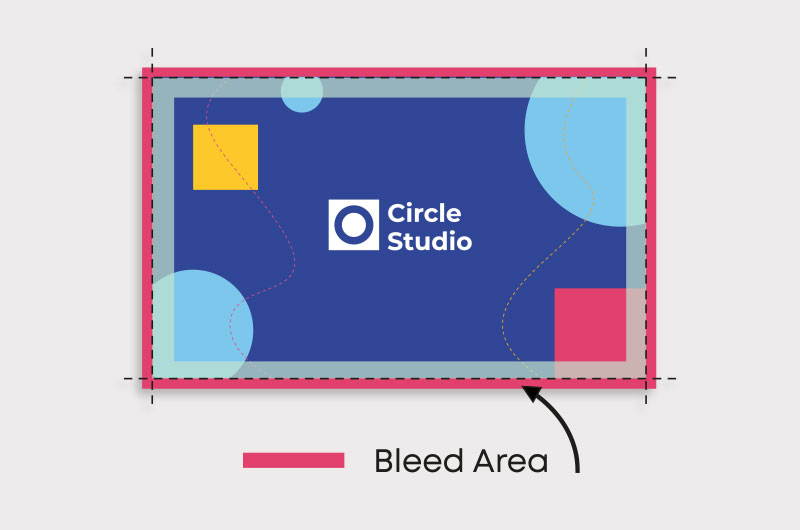
What is the safe zone in printing?
While the bleed area is the 3mm border around the outside of your artwork to keep it looking neat and tidy after trimming, the safe zone refers to the 3mm area inside of the cut line.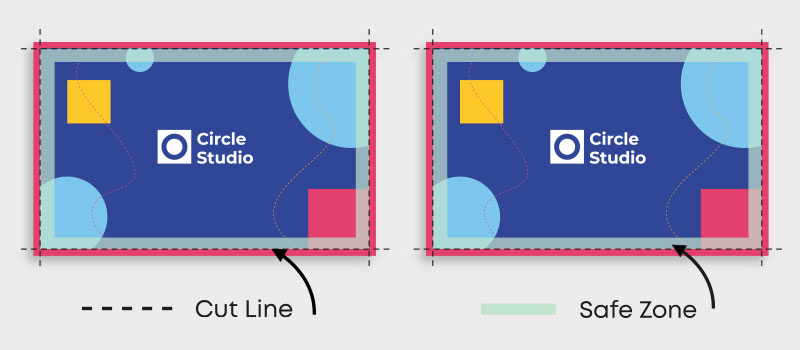
This zone is used to make sure any important information and graphics are far enough away from the cut line that they won’t get trimmed off with our guillotine. An easy way to do this? Just keep important stuff away from the edge of your design!
Again, this is something our team will check for before sending your artwork to print, so don’t worry if you’re not sure about this!
Table of sizes and resolutions
The following table gives dimensions for preparing artwork with a 3mm bleed area for a range of common document sizes. For information on supplying artwork at the correct resolution, check out our Resolution Guide.
| Size in mm (without bleed) | Size in mm (with bleed) | |
|---|---|---|
| Business Cards | 88 x 55mm | 91 x 61mm |
| DL | 99 x 210mm | 105 x 216mm |
| A6 | 105 x 148mm | 111 x 154mm |
| A5 | 148 x 210mm | 154 x 216mm |
| A4 | 210 x 297mm | 216 x 303mm |
| A3 | 297 x 420mm | 303 x 426mm |
| A2 | 420 x 594mm | 426 x 600mm |
| A1 | 594 x 841mm | 600 x 847mm |
| A0 | 841 x 1189mm | 847 x 1195mm |
For a comprehensive set of dimensions for commonly used documents, you may want to refer to our guide to document sizes.